
Monday, 9 December 2013
What I wore today.
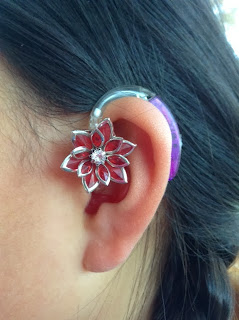
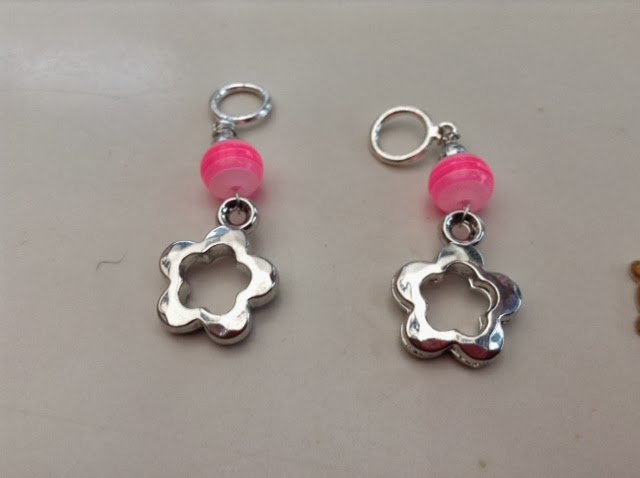
These are the charms I wore today to school. I mad them last week. Do you like them?

Lots of charms! (with video tutorial)
This weekend I made lots of charms:

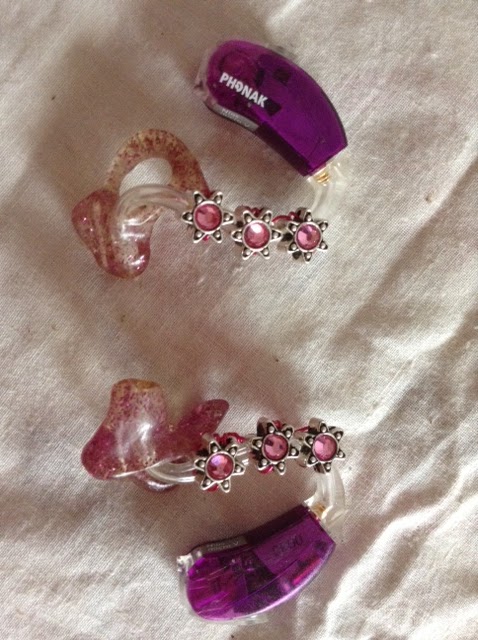
I am taking all of these to my audiologist on Thursday. He will give them out to other girls who use hearing aids like me. Sometimes children don't know they can decorate their hearing aids, and they don't like wearing them. I hope my decorations will help them feel happy to have hearing aids.
I also made these:

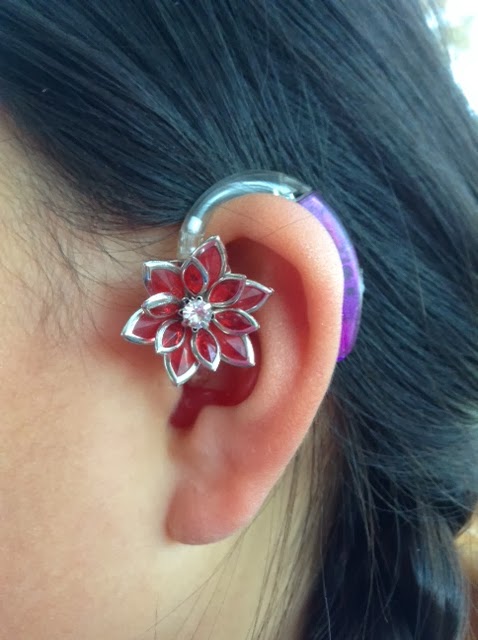
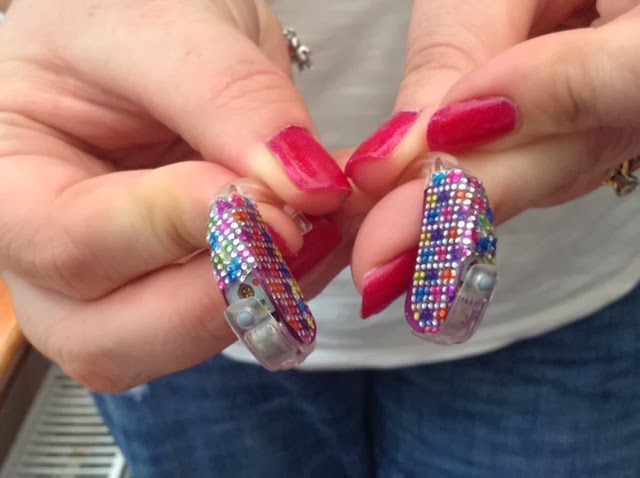
These are for me!

I am taking all of these to my audiologist on Thursday. He will give them out to other girls who use hearing aids like me. Sometimes children don't know they can decorate their hearing aids, and they don't like wearing them. I hope my decorations will help them feel happy to have hearing aids.
I also made these:

These are for me!
You can see how to make this kind of decorations with pictures and texts in an older post, here.
Or you can see it in this video (the video is in two parts):Tuesday, 12 November 2013
Flowers - tutorial
We went to the Leven bead shop, and found these nice beads:

This is what the back of the beads look like:

To turn them into decorations for my hearing aids we used a bit of red wire from the bead shop, and passed it through the gaps at the back, like this,

We piece at the back is very soft, so you can bend it easily to put the wire through. You have to leave enough space to put the tube of the hearing aid through. Then you make a knot with the wire, and cut the ends off so they don't scratch your ears.
And this is what the decorations look like,
Do you like them?
Friday, 1 November 2013
Colourful tubes!
My mum found some nail wraps in Paperchase:

They are very soft, almost like cling film. They have no glue. They are great for wrapping around the tubes of my hearing aids, because they are so bendy and they can be removed so easily.
Have a look:


They are very soft, almost like cling film. They have no glue. They are great for wrapping around the tubes of my hearing aids, because they are so bendy and they can be removed so easily.
Have a look:

Do you like them?
Sunday, 27 October 2013
My Halloween outfit - with blue twists!
Today we got my Halloween outfit ready for Thursday! There will be a party at the school, and we will also go trick-or-treating in the evening.
Here is what it looks like. You can see my blue glittery twists!

They make the outfit look extra special.

Here is what it looks like. You can see my blue glittery twists!

They make the outfit look extra special.

Thursday, 24 October 2013
Glitter twists - tutorial
I have not written for a while because of the school holiday.
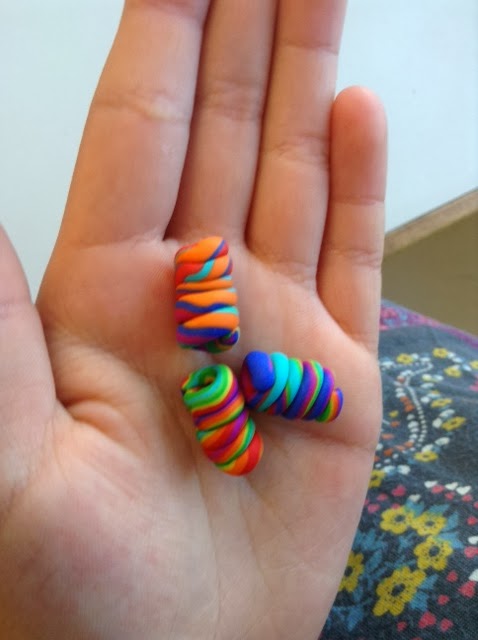
Yesterday I made some new twists with Fimo and glitter. They look really nice and I am wearing them to school today.
This is what they look like:

They go really well with my glittery moulds.
To make them you have to make twists. First, you make two long sticks of Fimo, rolling the fimo with your hands like this,

This is what the sticks should look like:

They have to be nice and even. Then you twist them around a crochet hook, like this,

and you can squeeze them together,

or leave them more separated:

Sometimes I like to roll them on the crochet stick, so they get a flat surface, instead of a round surface:


Then you bake them in the oven, following the instructions on the Fimo packet.
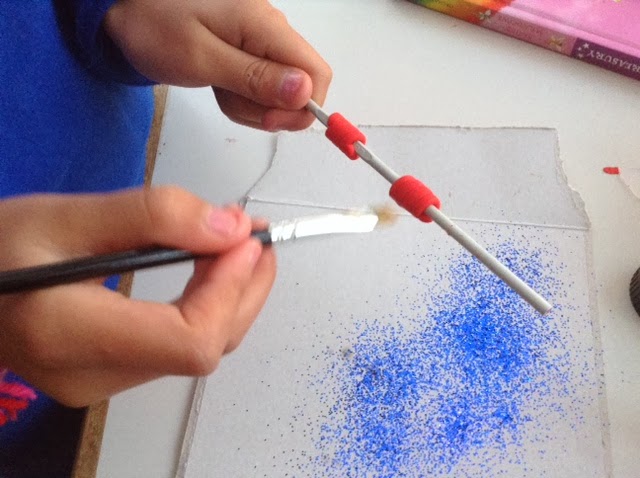
When they are out and cool, you paint them with Fimo varnish,

and whilst the varnish is still wet you shake glitter on top of it,

You have to wait overnight for them to dry, and then you can wear them!

Yesterday I made some new twists with Fimo and glitter. They look really nice and I am wearing them to school today.
This is what they look like:

They go really well with my glittery moulds.
To make them you have to make twists. First, you make two long sticks of Fimo, rolling the fimo with your hands like this,

This is what the sticks should look like:

They have to be nice and even. Then you twist them around a crochet hook, like this,

and you can squeeze them together,

or leave them more separated:

Sometimes I like to roll them on the crochet stick, so they get a flat surface, instead of a round surface:


Then you bake them in the oven, following the instructions on the Fimo packet.
When they are out and cool, you paint them with Fimo varnish,
and whilst the varnish is still wet you shake glitter on top of it,

You have to wait overnight for them to dry, and then you can wear them!

Monday, 30 September 2013

Sunday, 29 September 2013
Twists and ladybirds
Here are the ladybirds decorations that I showed you yesterday. I also made some Fimo twists, and I varnished it with a special Fimo varnish my mum got on the internet.

The twists look really nice and shiny! I also tried sticking some little gems onto the twists. It was difficult, I had to use tweezers:

To start with it looked really nice, and I took this picture,

but the next morning they all fell out. So now I have to think about a different way of sticking the little gems.
Saturday, 28 September 2013
Ladybirds
Look at my crab apple tree, it has lots of red apples.

Yesterday we made lots of new things. With some earrings from Claire's I made some lady bug decorations for my hearing aids.

My mum separated the lady bird from the earring,

and I made the decoration using the method I explained here,

I hope you like them! I am going to wear them today.
Sunday, 22 September 2013


More twisters... and lots of other things!
Yesterday a little friend visited, and we spend the afternoon making decorations for our hearing aids. We made some more twisters with Fimo, like these,

and these,

and these:

We also made some dangling charm decorations,

and my friend's mum brought some fantastic nail foils, and I tried them for the first time! They are great:


and these,

and these:
We also made some dangling charm decorations,
and my friend's mum brought some fantastic nail foils, and I tried them for the first time! They are great:
Saturday, 21 September 2013
Tutorial - twister decorations

You put them close together like this,

and you roll them gently with your hand so they stick:

this is what you get to start with:


and curl it gently around a crochet hook.

Bake them in the oven at 110C for 20 min, and that's it! You can also make them in solid colors, or twisting two colours together like this:

Friday, 20 September 2013
Rainbow twister decorations
The Fimo arrived and we made some twisting decorations yesterday!
This is what they look like, I hope you like them!
They are really easy to make.

I will be posting a tutorial tomorrow.
Sunday, 15 September 2013
Tutorial - Difficult tube decorations
Yesterday we went to the beadshop near where we live. We bought lots of things to make decorations for my hearing aids. My daddy wanted to make something to go on the tubes and he made these:


If you want to make something similar this is what you need: beads, wire and small pliers (and a stick or something the same thickness as your tube. We used a crochet stick).

You take a piece of wire, you thread it through the bead,

you twist the wire round itself several times,

then you add a new bead and start again.

my daddy put three beads in total. and when you have finished you wind the wire and clip off the end and tuck in the ends to make sure the are not spiky.

And this is what they look like.

Subscribe to:
Posts (Atom)